 Rear subframe assembly (multi-link configuration)后副车架总成(多连杆配置)
Removal procedure拆卸程序
|
1. Preparation1. 准备工作
1 Drive the vehicle into the lift position, activate the parking brake, and put the vehicle power supply in the "OFF" state.将车辆驶入举升机举升位置,启用驻车制动,整车电源处于“OFF”状态。
2 Disconnect the negative terminal of the 12V battery断开蓄电池负极
3 Lift the vehicle.举升车辆。
|
|
2. Remove the left rear wheel assembly2. 拆卸左后车轮总成
|
|
3. Remove the right rear wheel assembly3. 拆卸右后车轮总成
|
|
4. Remove the left rear wheel fender assembly4. 拆卸左后轮挡泥板总成
|
|
5. Remove the right rear wheel fender assembly5. 拆卸右后轮挡泥板总成
|
|
6. Remove the rear floor guard body (multi-link configuration)6. 拆卸后地板后下护板本体(多连杆配置)
|
|
7. Remove the rear floor and front lower guard body (multi-link configuration)7. 拆卸后地板前下护板本体(多连杆配置)
|
|
8. Remove the rear floor panel bracket (multi-link configuration)8. 拆卸后地板底护板支架(多连杆配置)
|
|
9. Disassemble the rear transverse stabilizer bar assembly (multi-link configuration)9. 拆卸后横向稳定杆总成(多连杆配置)
|
|
10. Remove the left rear transverse stabilizer rod (multi-link configuration)10. 拆卸左后横向稳定杆拉杆(多连杆配置)
|
|
11. Remove the right rear transverse stabilizer rod (multi-link configuration)11. 拆卸右后横向稳定杆拉杆(多连杆配置)
|
|
12. Remove the rear lower trailing arm assembly (multi-link configuration)12. 拆卸后下纵臂总成(多连杆配置)
|
|
13. Remove the rear front toe arm assembly (multi-link configuration)13. 拆卸后前束臂总成(多连杆配置)
|
|
14. Remove the left rear lower arm assembly (multi-link configuration)14. 拆卸左后下臂总成(多连杆配置)
|
|
15. Remove the right rear lower arm assembly (multi-link configuration)15. 拆卸右后下臂总成(多连杆配置)
|
|
16. Remove the rear coil spring (multi-link configuration)16. 拆卸后螺旋弹簧(多连杆配置)
|
|
17. Remove the rubber pad on the rear spring (multi-link configuration)17. 拆卸后弹簧上橡胶垫(多连杆配置)
|
|
18. Remove the rubber pad under the rear spring (multi-link configuration)18. 拆卸后弹簧下橡胶垫(多连杆配置)
|
|
19. Disassemble the motor-integrated left rear caliper assembly19. 拆卸电机集成式左后卡钳总成
|
|
20. Remove the in-line wheel speed sensor (rear)20. 拆卸直插式轮速传感器(后)
|
|
21. Disassemble the rear subframe assembly21. 拆卸后副车架总成
1 Remove all wiring harnesses.拆卸所有线束。
|
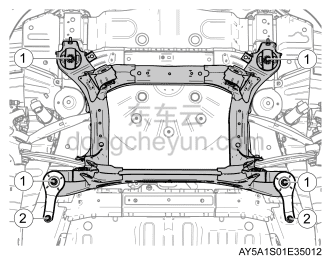 |
2 Use a hydraulic lifting platform car to support the rear subframe assembly, and remove 2 fixing bolts ② and 4 fixing bolts ①.使用液压升降平台车支撑后副车架总成,拆卸2颗固定螺栓②、4颗固定螺栓①。
3 Slowly lower the hydraulic lifting platform vehicle and remove the rear subframe assembly.缓慢降下液压升降平台车,取下后副车架总成。
4 Remove the rear upper arm assembly (multi-link configuration).拆卸后上臂总成(多连杆配置)。
5 Remove the guide arm assembly (multi-link configuration).拆卸导向臂总成(多连杆配置)。
|

Installation procedure安装程序
|
1. Install the rear subframe assembly1. 安装后副车架总成
1 Install the guide arm assembly (multi-link configuration).安装导向臂总成(多连杆配置)。
2 Install the rear upper arm assembly (multi-link configuration).安装后上臂总成(多连杆配置)。
|
|
|
3 Slowly raise the hydraulic lifting platform truck, align the mounting holes, and install the 4 fixing bolts ①. 2 fixing bolts ② and tighten.缓慢升起液压升降平台车,对准安装孔位,安装4颗固定螺栓①。2颗固定螺栓②并紧固。
4 Install all wiring harnesses.安装所有线束。
|
|
2. Install the in-line wheel speed sensor (rear)2. 安装直插式轮速传感器(后)
|
|
3. Install the motor-integrated left rear caliper assembly3. 安装电机集成式左后卡钳总成
|
|
4. After installation, the spring is lowered by a rubber pad (for multi-link configuration).4. 安装后弹簧下橡胶垫(多连杆配置)
|
|
5. Install the rubber pad on the rear spring (multi-link configuration)5. 安装后弹簧上橡胶垫(多连杆配置)
|
|
6. Install rear coil spring (multi-link configuration)6. 安装后螺旋弹簧(多连杆配置)
|
|
7. Install the right rear lower arm assembly (multi-link configuration)7. 安装右后下臂总成(多连杆配置)
|
|
8. Install the left rear lower arm assembly (multi-link configuration)8. 安装左后下臂总成(多连杆配置)
|
|
9. Install the rear front toe arm assembly (multi-link configuration)9. 安装后前束臂总成(多连杆配置)
|
|
10. Install the rear lower trailing arm assembly (multi-link configuration)10. 安装后下纵臂总成(多连杆配置)
|
|
11. Install the right rear transverse stabilizer bar (multi-link configuration)11. 安装右后横向稳定杆拉杆(多连杆配置)
|
|
12. Install the left rear transverse stabilizer rod (multi-link configuration)12. 安装左后横向稳定杆拉杆(多连杆配置)
|
|
13. Install the rear transverse stabilizer bar assembly (multi-link configuration)13. 安装后横向稳定杆总成(多连杆配置)
|
|
14. Install the rear floor panel bracket (multi-link configuration)14. 安装后地板底护板支架(多连杆配置)
|
|
15. Install the rear floor and front lower guard body (multi-link configuration)15. 安装后地板前下护板本体(多连杆配置)
|
|
16. Install the rear floor guard body (multi-link configuration)16. 安装后地板后下护板本体(多连杆配置)
|
|
17. Install the right rear wheel fender assembly17. 安装右后轮挡泥板总成
|
|
18. Install the left rear wheel fender assembly18. 安装左后轮挡泥板总成
|
|
19. Install the right rear wheel assembly19. 安装右后车轮总成
|
|
20. Install the left rear wheel assembly20. 安装左后车轮总成
|
|
21. Carry out four-wheel alignment21. 进行四轮定位
|
|
22. Land the vehicle, connect the negative terminal of the 12V battery, start the vehicle and drive away from the lift, conduct a road test and check22. 降落车辆,连接蓄电池负极,起动车辆并驶离举升机,路试检查
|