 Top cover glass assembly顶盖玻璃总成
Removal procedure拆卸程序
|
1. Preparation1. 准备工作
1 Park the vehicle on a flat road, activate the parking brake, and turn the vehicle power supply to "OFF".将车辆停在平坦路面,启用驻车制动,整车电源处于“OFF”状态。
2 Disconnect the negative terminal of the 12V battery.断开蓄电池负极。
|
|
2. Remove the second row seat cushion assembly2. 拆卸第二排座椅坐垫总成
|
|
3. Remove the second row left seat back assembly3. 拆卸第二排左座椅靠背总成
|
|
4. Remove the second row right seat back assembly4. 拆卸第二排右座椅靠背总成
|
|
5. Remove the second row left backrest connection bracket5. 拆卸第二排左靠背连接支架
|
|
6. Remove the second row right backrest connection bracket6. 拆卸第二排右靠背连接支架
|
|
7. Remove the driver's side lower left decorative panel assembly7. 拆卸驾驶侧左下装饰板总成
|
|
8. Remove the driver's side lower cover panel assembly8. 拆卸驾驶侧下护板总成
|
|
9. Remove the left end cover assembly of the instrument panel9. 拆卸仪表板左侧端盖总成
|
|
10. Remove the left end cover of the instrument panel10. 拆卸仪表板左侧端盖盖板
|
|
11. Remove the left front inner sill trim panel assembly11. 拆卸左前内门槛饰板总成
|
|
12. Remove the left rear inner sill trim panel assembly12. 拆卸左后内门槛饰板总成
|
|
13. Remove the passenger side lower right decorative panel assembly13. 拆卸副驾驶侧右下装饰板总成
|
|
14. Remove the right end cover assembly of the instrument panel14. 拆卸仪表板右侧端盖总成
|
|
15. Remove the right end cover of the instrument panel15. 拆卸仪表板右侧端盖盖板
|
|
16. Remove the right front inner sill trim panel assembly16. 拆卸右前内门槛饰板总成
|
|
17. Remove the right rear inner sill trim panel assembly17. 拆卸右后内门槛饰板总成
|
|
18. Remove the hatchback door sill trim panel assembly18. 拆卸掀背门门槛饰板总成
|
|
19. Remove the left A-pillar upper trim panel assembly19. 拆卸左A柱上饰板总成
|
|
20. Remove the left B-pillar air outlet assembly20. 拆卸左侧B柱出风口总成
|
|
21. Remove the left B-pillar lower trim panel assembly21. 拆卸左B柱下饰板总成
|
|
22. Remove the left B-pillar upper trim panel assembly22. 拆卸左B柱上饰板总成
|
|
23. Remove the trunk light23. 拆卸行李箱灯
|
|
24. Remove the backup power socket (right C-pillar)24. 拆卸后备电源插座(右C柱)
|
|
25. Remove the left C-pillar lower trim panel assembly25. 拆卸左C柱下饰板总成
|
|
26. Remove the left C-pillar upper trim panel assembly26. 拆卸左C柱上饰板总成
|
|
27. Remove the right A-pillar upper trim panel assembly27. 拆卸右A柱上饰板总成
|
|
28. Remove the right B-pillar air outlet assembly28. 拆卸右侧B柱出风口总成
|
|
29. Remove the right B-pillar lower trim panel assembly29. 拆卸右B柱下饰板总成
|
|
30. Remove the right B-pillar upper trim panel assembly30. 拆卸右B柱上饰板总成
|
|
31. Remove the right C-pillar lower trim panel assembly31. 拆卸右C柱下饰板总成
|
|
32. Remove the upper trim panel assembly of the right C-pillar32. 拆卸右C柱上饰板总成
|
|
33. Remove the front dome light33. 拆卸前排顶灯
|
|
34. Remove the right rear dome light34. 拆卸右后排顶灯
|
|
35. Remove the left rear dome light35. 拆卸左后排顶灯
|
|
36. Disassembly of the left sun visor assembly36. 拆卸左遮阳板总成
|
|
37. Disassembly of the right sun visor assembly37. 拆卸右遮阳板总成
|
|
38. Remove sun visor hooks38. 拆卸遮阳板挂钩
|
|
39. Remove the left rear roof handle assembly39. 拆卸左后顶棚拉手总成
|
|
40. Remove the right rear ceiling handle assembly40. 拆卸右后顶棚拉手总成
|
|
41. Remove the ceiling handle assembly41. 拆卸顶棚拉手总成
|
|
42. Remove the ceiling assembly42. 拆卸顶棚总成
|
|
43. Remove the left luggage rack assembly43. 拆卸左行李架总成
|
|
44. Remove the right luggage rack assembly44. 拆卸右行李架总成
|
|
45. Perform protective operations45. 进行保护操作
1 Use film to cover the area around the air vents of the air conditioner to prevent scattered broken glass from falling into the vents and causing hidden dangers.使用薄膜覆盖空调风口周围部位,防止散落的碎玻璃掉入风口内造成隐患。
2 Paste protective tape on the body around the roof glass assembly to prevent damage to the body surface during disassembly.在顶盖玻璃总成四周车身上粘贴保护胶带,防止拆卸过程中损伤车身表面。
|

|
46. Remove the top cover glass assembly46. 拆卸顶盖玻璃总成
|
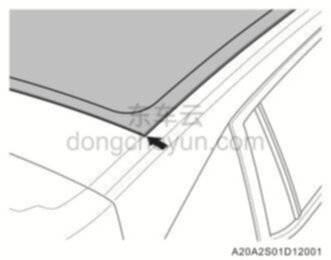 |
1 Use the wire feed tool to thread the wire rope through the seam between the body and roof glass assembly from the position shown.从图示位置使用送线工具将钢丝绳穿过车身和顶盖玻璃总成之间的接缝。
2 Tie both ends of the wire to a workable block of wood or similar object.将钢丝线的两端系在可操作的木块或类似物体上。
|
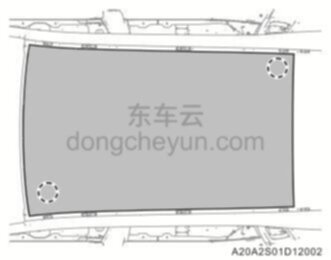 |
3 Pull the wire rope around the top glass assembly to cut the adhesive.沿顶盖玻璃总成周围拉动钢丝绳,切割粘合剂。
|

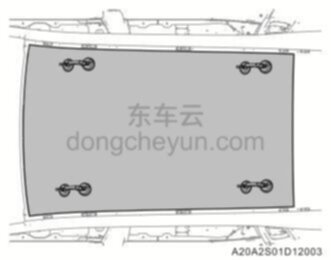 |
4 Use a suction cup to remove the top cover glass assembly.使用吸盘取下顶盖玻璃总成。
5 Use a scraper to remove excess adhesive from the body contact surfaces.使用刮刀清除车身接触面上多余的粘合剂。
6 Clean vehicle interior debris and body surfaces.清洁车辆内部碎屑和车身表面。
|
Installation procedure安装程序
|
|
1. Install the top cover glass assembly1. 安装顶盖玻璃总成
|
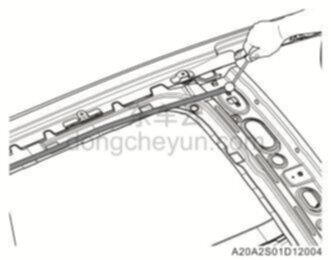 |
1 Use DuPont 5402 primer to evenly apply it to the installation position of the top cover glass assembly on the body. The width of the application is about 20mm, and it needs to cover the original primer track of the body.使用杜邦5402底涂均匀涂抹到顶盖玻璃总成在车身上的安装位置,涂抹宽度约20mm,需覆盖车身原底涂轨迹。
|

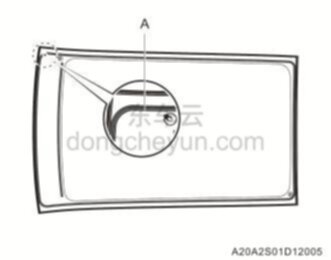 |
2 As shown in the picture, apply glass glue evenly on the black primer surface A of the top cover glass.如图所示,在顶盖玻璃的黑色底涂面A上均匀涂抹玻璃胶。
|
|
|
3 Install the top cover glass assembly.安装顶盖玻璃总成。
|
|
2. Remove the covering film from the car interior2. 取出车内的覆盖薄膜
|
|
3. Check for water leakage (rain test)3. 检查是否漏水(淋雨试验)
|
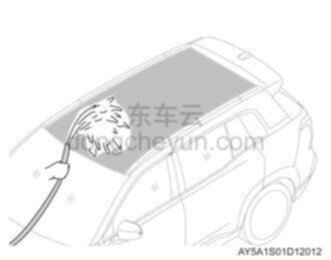 |
1 After the roof glass is installed, it will take some time for the glue to solidify. To ensure a good bonding effect, please wait at least 4 hours before spraying water, and let it sit for 3 days before using the vehicle. Be careful not to use it at high speeds, bumps, or other harsh working conditions within 7 days. The vehicle can be used normally after 7 days when the glue is completely cured.顶盖玻璃安装后胶水需一定时间使胶水固化,为保证良好的粘接效果,请至少4h后再进行淋水,静置3天后方可使用车辆,注意7天内不要在高速、颠簸或其他恶劣工况下使用,7天胶水完全固化后可正常使用车辆。
2 Remove the protective tape.揭下保护胶带。
|
|
4. Install/remove left luggage rack assembly4. 安装卸左行李架总成
|
|
5. Install the right luggage rack assembly5. 安装右行李架总成
|
|
6. Install the ceiling assembly6. 安装顶棚总成
|
|
7. Install the ceiling handle assembly7. 安装顶棚拉手总成
|
|
8. Install the right rear ceiling handle assembly8. 安装右后顶棚拉手总成
|
|
9. Install the left rear ceiling handle assembly9. 安装左后顶棚拉手总成
|
|
10. Install sun visor hooks10. 安装遮阳板挂钩
|
|
11. Install the right sun visor assembly11. 安装右遮阳板总成
|
|
12. Install the left sun visor assembly12. 安装左遮阳板总成
|
|
13. Install the right rear dome light13. 安装右后排顶灯
|
|
14. Install the left rear dome light14. 安装左后排顶灯
|
|
15. Install front dome lights15. 安装前排顶灯
|
|
16. Install the right C-pillar upper trim panel assembly16. 安装右C柱上饰板总成
|
|
17. Install the right C-pillar lower trim panel assembly17. 安装右C柱下饰板总成
|
|
18. Install the backup power socket (right C-pillar)18. 安装后备电源插座(右C柱)
|
|
19. Install the right B-pillar upper trim panel assembly19. 安装右B柱上饰板总成
|
|
20. Install the right B-pillar lower trim panel assembly20. 安装右B柱下饰板总成
|
|
21. Install the right B-pillar air outlet assembly21. 安装右侧B柱出风口总成
|
|
22. Install the right A-pillar upper trim panel assembly22. 安装右A柱上饰板总成
|
|
23. Install the left C-pillar upper trim panel assembly23. 安装左C柱上饰板总成
|
|
24. Install the left C-pillar lower trim panel assembly24. 安装左C柱下饰板总成
|
|
25. Install trunk light25. 安装行李箱灯
|
|
26. Install the left B-pillar upper trim panel assembly26. 安装左B柱上饰板总成
|
|
27. Install the left B-pillar lower trim panel assembly27. 安装左B柱下饰板总成
|
|
28. Install the left B-pillar air outlet assembly28. 安装左侧B柱出风口总成
|
|
29. Install the left A-pillar upper trim panel assembly29. 安装左A柱上饰板总成
|
|
30. Install hatchback door sill trim panel assembly30. 安装掀背门门槛饰板总成
|
|
31. Install the right rear inner sill trim panel assembly31. 安装右后内门槛饰板总成
|
|
32. Install right front interior door sill trim assembly32. 安装右前内门槛饰板总成
|
|
33. Install the right-side end cover plate of the dashboard.33. 安装仪表板右侧端盖盖板
|
|
34. Install the right-side end cover assembly of the instrument panel.34. 安装仪表板右侧端盖总成
|
|
35. Install the lower right trim panel assembly on the passenger side.35. 安装副驾驶侧右下装饰板总成
|
|
36. Install the left rear inner door sill trim assembly.36. 安装左后内门槛饰板总成
|
|
37. Install the left front inner sill trim assembly37. 安装左前内门槛饰板总成
|
|
38. Install the left end cover plate of the instrument panel.38. 安装仪表板左侧端盖盖板
|
|
39. Install the left end cover assembly of the instrument panel.39. 安装仪表板左侧端盖总成
|
|
40. Install the driver's side lower cover panel assembly40. 安装驾驶侧下护板总成
|
|
41. Install the driver's side lower left decorative panel assembly41. 安装驾驶侧左下装饰板总成
|
|
42. Install the second row right backrest connection bracket42. 安装第二排右靠背连接支架
|
|
43. Install the second row left backrest connection bracket43. 安装第二排左靠背连接支架
|
|
44. Install the second row right seat back assembly44. 安装第二排右座椅靠背总成
|
|
45. Install the second row left seat back assembly45. 安装第二排左座椅靠背总成
|
|
46. Install the second row seat cushion assembly46. 安装第二排座椅坐垫总成
|
|
47. Connect the negative terminal of the 12V battery, start the vehicle, and check that all functions should work normally.47. 连接蓄电池负极,启动车辆,检查各功能应工作正常
|