 Integrated electric drive with subframe assembly (battery-swap version)集成电力驱动带副车架总成(换电版)
Removal procedure拆卸程序
|
1. Preparation1. 准备工作
1 Drive the vehicle into the lift position, activate the parking brake, and put the vehicle power supply in the "OFF" state.将车辆驶入举升机举升位置,启用驻车制动,使整车电源处于“OFF”状态。
2 Disconnect the negative terminal of the 12V battery.断开蓄电池负极。
3 Lift the vehicle.举升车辆。
|
|
2. Remove the front compartment front upper cover panel assembly2. 拆卸机舱前上护板总成
|
|
3. Remove the front compartment front lower cover panel assembly3. 拆卸机舱前下护板总成
|
|
4. Drain the temperature control system coolant4. 排放温控系统冷却液
|
|
5. Discharge differential gear oil5. 排放差减齿轮油
|
|
6. Remove the left front wheel arch assembly6. 拆卸左前轮眉总成
|
|
7. Remove the right front wheel arch assembly7. 拆卸右前轮眉总成
|
|
8. Remove the front bumper assembly8. 拆卸前保险杠总成
|
|
9. Remove the front pedestrian calf protection bracket9. 拆卸前行人小腿保护支架
|
|
10. Remove the left front wheel assembly10. 拆卸左前车轮总成
|
|
11. Remove the right front wheel assembly11. 拆卸右前车轮总成
|
|
12. Remove the left front wheel fender assembly12. 拆卸左前轮挡泥板总成
|
|
13. Remove the right front wheel fender assembly13. 拆卸右前轮挡泥板总成
|
|
14. Remove the left front drive shaft assembly14. 拆卸左前驱动轴总成
|
|
15. Remove the right front drive shaft assembly15. 拆卸右前驱动轴总成
|
|
16. Disassemble the air conditioning compressor assembly16. 拆卸空调压缩机总成
|

|
17. Remove the 12V battery17. 拆卸蓄电池
|
|
18. Remove the 12V battery tray18. 拆卸蓄电池托盘
|
|
19. Disassemble the integrated electric drive with subframe assembly19. 拆卸集成电力驱动带副车架总成
|
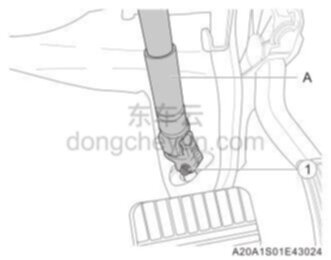 |
1 Remove the fixing bolt ① and disconnect the electric power steering column assembly A from the mechanical steering gear assembly.拆卸固定螺栓①,断开电动助力转向管柱总成A与机械转向器总成的连接。
|
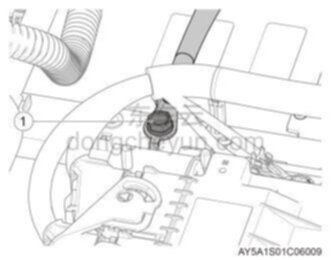 |
2 Remove the DCDC grounding harness fixing bolt ①.拆卸DCDC接地线束固定螺栓①。
|
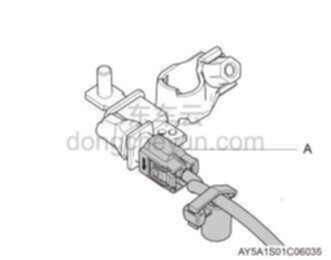 |
3 Disconnect connector A.断开接插件A。
|
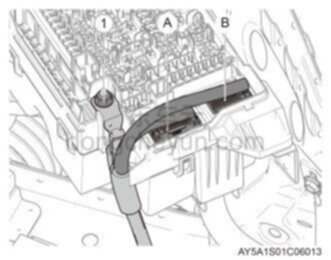 |
4 Disconnect connectors A and B of the front compartment electrical box, remove the fixing nut ①, and disconnect the front compartment wiring harness II from the front compartment electrical box.断开前舱电器盒接插件A、B,拆卸固定螺母①,断开前舱线束II与前舱电器盒的连接。
|
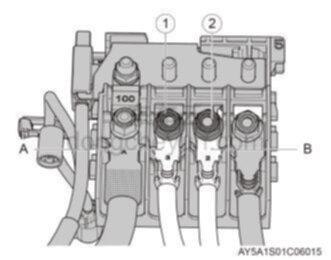 |
5 Remove the fixing nut ① and the fixing nut ②, and disconnect the positive wire harness A and B.拆卸固定螺母①、固定螺母②,断开正极线束A、B。
|
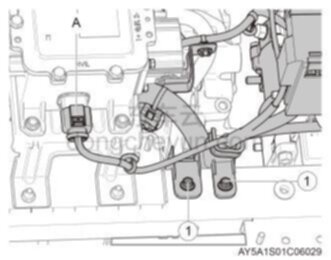 |
6 Disconnect connector A and remove the 2 fixing bolts ①.断开接插件A,拆卸2颗固定螺栓①。
|
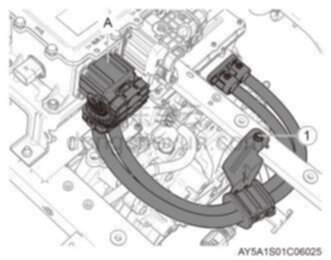 |
7 Disconnect the high-voltage harness connector A of the motor controller and remove the fixing bolt ①.断开电机控制器高压线束接插件A,拆卸固定螺栓①。
|
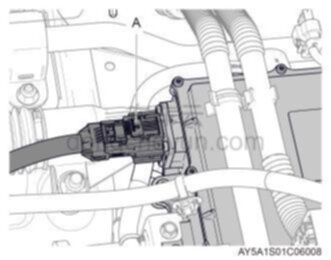 |
8 Disconnect connector A.断开接插件A。
|
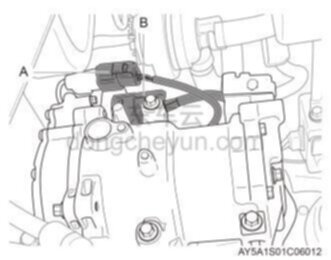 |
9 Disconnect compressor connectors A and B.断开压缩机接插件A、B。
|
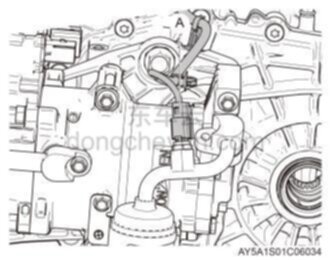 |
10 Disconnect connector A.断开接插件A。
|
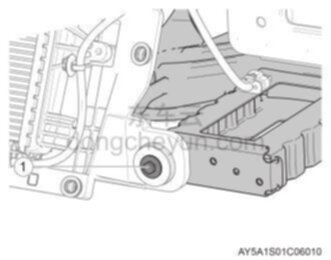 |
11 Remove the fixing bolts ① connecting the motor radiator and electronic fan assembly to the front subframe.拆卸电机散热器及电子风扇总成与前副车架连接固定螺栓①。
|
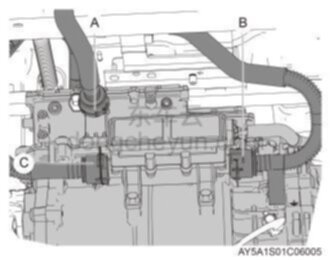 |
12 Disconnect water pipe connectors A, B, and C.断开水管接头A、B、C。
|
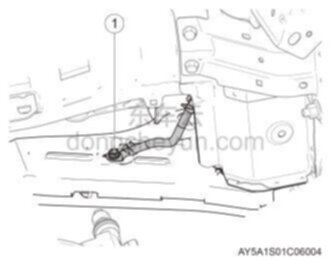 |
13 Remove the grounding harness fixing bolt ①.拆卸接地线束固定螺栓①。
|
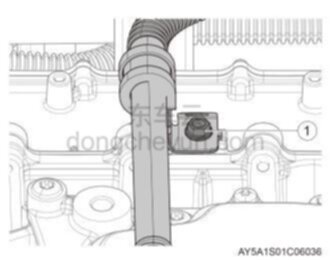 |
14 Remove the IDU to ITS water pipe Ⅰ fixing bolt ①.拆卸IDU至ITS水管Ⅰ固定螺栓①。
|
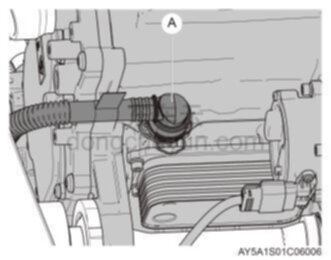 |
15 Disconnect water pipe connector A.断开水管接头A。
16 Use a hydraulic lifting platform truck to firmly support the integrated electric drive with subframe assembly.使用液压升降平台车稳固支撑集成电力驱动带副车架总成。
|

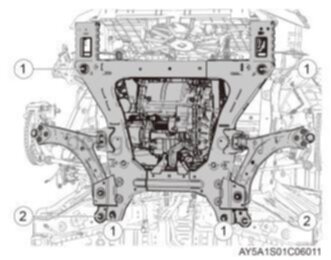 |
17 Remove 2 fixing bolts ② and 4 fixing bolts ①, slowly lower the hydraulic lifting platform vehicle, and remove the integrated electric drive with subframe assembly.拆卸2颗固定螺栓②、4颗固定螺栓①,缓慢降落液压升降平台车,取下集成电力驱动带副车架总成。
|

Installation procedure安装程序
|
1. Install the integrated electric drive with subframe assembly1. 安装集成电力驱动带副车架总成
|
|
|
1 Lift and adjust the integrated electric drive with subframe assembly to the installation position, install 4 fixing bolts ① and 2 fixing bolts ② and tighten them.举升并调整集成电力驱动带副车架总成到安装位置,安装4颗固定螺栓①,2颗固定螺栓②并紧固。
|
|
|
2 Connect the water hose connector to the integrated electric drive assembly with subframe.连接水管接头到集成电力驱动总成带副车架。
|
|
|
3 Place the IDU to ITS water pipe Ⅰ water pipe bracket to the installation position, install the fixing bolt ① and tighten it.放置IDU至ITS水管Ⅰ水管支架至安装位置,安装固定螺栓①并紧固。
|
|
|
4 Install the grounding harness fixing bolt ① and tighten it.安装接地线束固定螺栓①并紧固。
|
|
|
5 Connect water pipe joints A, B, and C.连接水管接头A、B、C。
|
|
|
6 Install the motor radiator and electronic fan assembly and the front subframe fixing bolts ① and tighten them.安装电机散热器及电子风扇总成与前副车架固定螺栓①并紧固。
|
|
|
7 Connect connector A.连接接插件A。
|
|
|
8 Connect connectors A and B.连接接插件A、B。
|
|
|
9 Connect connector A.连接接插件A。
|
|
|
10 Place and adjust the high-voltage wire harness of the motor controller to the installation position, install and tighten the fixing bolt ①, and connect connector A.放置并调整电机控制器高压线束到安装位置,安装固定螺栓①并紧固,连接接插件A。
|
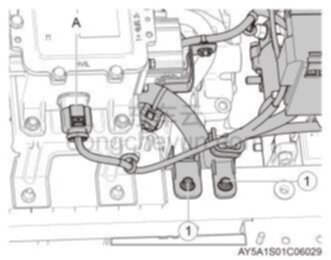 |
11 Place and adjust the front compartment wiring harness Ⅱ to the installation position, install the 2 fixing bolts ① of the bracket and tighten them, and connect connector A.放置并调整前舱线束Ⅱ到安装位置,安装支架2颗固定螺栓①并紧固,连接接插件A。
|
|
|
12 Place and adjust the positive wire harness A and B to the installation position, install the fixing nut ① and the fixing nut ② and tighten them.放置并调整正极线束A、B到安装位置,安装固定螺母①、固定螺母②并紧固。
|
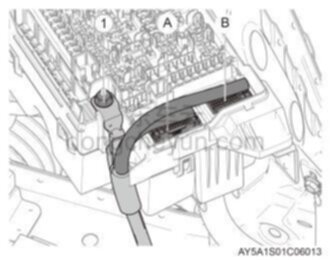 |
13 Place and adjust the front compartment wiring harness II to the front compartment electrical box, install and tighten the fixing nut ①, and connect connectors A and B.放置并调整前舱线束II到前舱电器盒,安装固定螺母①并紧固,连接接插件A、B。
|
|
|
14 Connect connector A to the battery sensor.连接接插件A到电池传感器。
|
|
|
15 Install the DCDC grounding harness fixing bolt ① and tighten it.安装DCDC接地线束固定螺栓①并紧固。
|
|
|
16 Connect the electric power steering column assembly A to the mechanical steering gear assembly, install the connecting bolt ① and tighten it.连接电动助力转向管柱总成A到机械转向器总成,安装连接螺栓①并紧固。
|
|
2. Install the 12V battery tray2. 安装蓄电池托盘
|
|
3. Install the 12V battery3. 安装蓄电池
|
|
4. Install air conditioning compressor assembly4. 安装空调压缩机总成
|
|
5. Install the left front drive shaft assembly5. 安装左前驱动轴总成
|
|
6. Install the right front drive shaft assembly6. 安装右前驱动轴总成
|
|
7. Install the right front wheel fender assembly7. 安装右前轮挡泥板总成
|
|
8. Install the left front wheel fender assembly8. 安装左前轮挡泥板总成
|
|
9. Install the right front wheel assembly9. 安装右前车轮总成
|
|
10. Install the left front wheel assembly10. 安装左前车轮总成
|
|
11. Install the front pedestrian calf protection bracket11. 安装前行人小腿保护支架
|
|
12. Install the front bumper assembly12. 安装前保险杠总成
|
|
13. Install the left front wheel arch assembly13. 安装左前轮眉总成
|
|
14. Install the right front wheel arch assembly14. 安装右前轮眉总成
|
|
15. Fill in differential gear oil15. 加注差减齿轮油
|
|
16. Fill the temperature control system coolant16. 加注温控系统冷却液
|
|
17. Install the front compartment front lower cover panel assembly17. 安装机舱前下护板总成
|
|
18. Install the front compartment front upper cover panel assembly18. 安装机舱前上护板总成
|
|
19. Land the vehicle, connect the negative terminal of the 12V battery, start the vehicle and drive away from the lift, conduct a road test and check19. 降落车辆,连接蓄电池负极,起动车辆并驶离举升机,路试检查
|