 Front windshield assembly前风窗总成
Removal procedure拆卸程序
|
1. Preparation1. 准备工作
1 Park the vehicle on a flat road, activate the parking brake, and turn the vehicle power supply to "OFF".将车辆停在平坦路面,启用驻车制动,整车电源处于“OFF”状态。
2 Disconnect the negative terminal of the 12V battery.断开蓄电池负极。
|
|
2. Remove the left scraper arm2. 拆卸左刮臂
|

|
3. Remove the right scraper arm3. 拆卸右刮臂
|
|
4. Remove the left side cover of the wiper cover4. 拆卸雨刮盖板左侧盖板
|
|
5. Remove the right side cover of the wiper cover5. 拆卸雨刮盖板右侧盖板
|
|
6. Remove the wiper cover6. 拆卸雨刮盖板
|
|
7. Remove the left A-pillar upper trim panel assembly7. 拆卸左A柱上饰板总成
|
|
8. Remove the right A-pillar upper trim panel assembly8. 拆卸右A柱上饰板总成
|
|
9. Remove the decorative cover on the interior mirror9. 拆卸内视镜上装饰盖
|
|
10. Remove the decorative cover under the endoscope10. 拆卸内视镜下装饰盖
|
|
11. Disassemble the endoscope assembly11. 拆卸内视镜总成
|
|
12. Disassemble the ETC on-board unit12. 拆卸ETC车载单元
|
|
13. Remove the rain light sensor13. 拆卸雨量光线传感器
|
|
14. Disassemble the front-view binocular camera14. 拆卸前视双目摄像头
|
|
15. Disassemble the smart Bluetooth module15. 拆卸智能蓝牙模块
|
|
16. Perform protective operations16. 进行保护操作
1 Use film to cover the area around the front windshield.使用薄膜覆盖前风窗周围部位。
2 Paste protective tape on the body around the front windshield assembly to prevent damage to the body surface during disassembly.在前风窗总成四周车身上粘贴保护胶带,防止拆卸过程中损伤车身表面。
|
|
17. Remove the front windshield assembly17. 拆卸前风窗总成
1 Use a razor blade to cut a section of glass glue and thread piano wire from the inside of the car through the seam between the body and the front windshield assembly.使用刀片切开一段玻璃胶,从车内将钢琴线穿过车身和前风窗总成之间的接缝。
|
 |
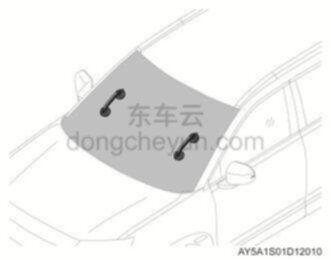
2 Pull the piano wire around the front windshield assembly and cut the glass glue.沿前风窗总成周围拉动钢琴线,切割玻璃胶。
|

 |
3 Use the glass suction cup to remove the front windshield assembly.使用玻璃吸盘取下前风窗总成。
|

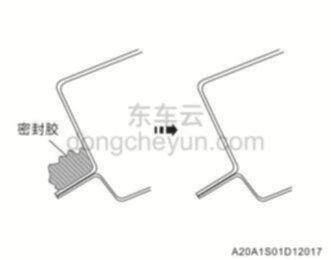 |
4 Use a scraper to remove excess glass glue from the body contact surface.使用刮刀清除车身接触面上多余的玻璃胶。
5 Clean vehicle interior debris and body surfaces.清洁车辆内部碎屑和车身表面。
|
Installation procedure安装程序
|
1. Install the front windshield assembly1. 安装前风窗总成
|
|
|
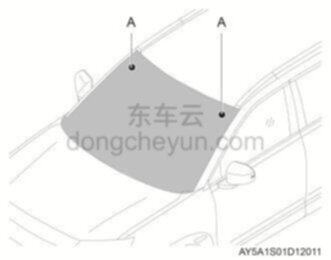
1 Align the two positioning pins A of the front windshield assembly with the mounting holes on the body.对准前风窗总成的2个定位销A和车身上的安装孔。
|
|
|
2 Use the glass suction cup to place the front windshield assembly into the installation position.使用玻璃吸盘将前风窗总成放置到安装位置。
|
|
|
3 Remove the front windshield assembly again.再次取下前风窗总成。
4 Use a sponge soaked in primer and apply evenly to where the glass will be installed on the car body.使用浸有底剂的海绵,均匀涂抹到玻璃在车身上的安装位置。
|
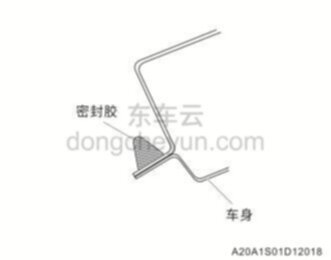 |
5 As shown in the picture, apply equal-section glass glue evenly on the body installation position.如图所示,在车身安装位置上均匀涂抹等截面玻璃胶。
|
|
|
6 Use the glass suction cup to place the front windshield assembly, align the relative position marks between the front windshield assembly and the body, align the positioning pin mounting holes, and then gently press in along the edge.使用玻璃吸盘放置前风窗总成,对齐前风窗总成与车身上的相对位置标记,对齐定位销安装孔,然后沿着边缘轻轻压入。
7 Gently press the surface of the front windshield assembly to ensure it is firmly installed on the vehicle body.轻轻按压前风窗总成表面,确保已将其牢固安装到车身上。
8 Use a scraper to remove any excess or protruding glass glue.使用刮刀清除所有多余或突出的玻璃胶。
9 Use protective tape to secure the front windshield assembly until the applied sealant hardens.使用保护胶带固定前风窗总成,直到涂抹的密封胶硬化。
10 Remove the covering film from the car.取出车内的覆盖薄膜。
|
|
2. Check for water leakage (rain test)2. 检查是否漏水(淋雨试验)
1 After the sealant hardens, sprinkle water from the outside of the vehicle (10 minutes) to check and confirm whether there is water leakage. If there is water leakage, clean the water traces and replenish the glass glue in time.密封胶硬化后,从车辆外部洒水(10min),检查并确认是否有水渗漏。若有水渗漏,则清洁水迹并及时补充玻璃胶。
2 Remove the protective tape.揭下保护胶带。
|
|
3. Install the endoscope assembly3. 安装内视镜总成
|
|
4. Install ETC on-board unit4. 安装ETC车载单元
|
|
5. Install the rain light sensor5. 安装雨量光线传感器
|
|
6. Install front-view binocular camera6. 安装前视双目摄像头
|
|
7. Install Bluetooth smart module7. 安装蓝牙智能模块
|
|
8. Install the lower trim cover of the endoscope8. 安装内视镜下饰盖
|
|
9. Install the decorative cover on the interior mirror9. 安装内视镜上装饰盖
|
|
10. Install the right A-pillar upper trim panel assembly10. 安装右A柱上饰板总成
|
|
11. Install the left A-pillar upper trim panel assembly11. 安装左A柱上饰板总成
|
|
12. Install the wiper cover assembly12. 安装雨刮盖板总成
|
|
13. Install the right side cover of the wiper cover13. 安装雨刮盖板右侧盖板
|
|
14. Install the left side cover of the wiper cover14. 安装雨刮盖板左侧盖板
|
|
15. Install the right scraper arm15. 安装右刮臂
|
|
16. Install the left scraper arm16. 安装左刮臂
|
|
17. Connect the negative terminal of the 12V battery, start the vehicle, and check that all functions should work normally.17. 连接蓄电池负极,启动车辆,检查各项功能应正常工作
|